Field Reporter Fast Trax: Easy Steps for Loading Budget Items into a Daily Log
- Dylan C
- Apr 17, 2023
- 3 min read
Updated: Jul 12, 2023

Before you can record the day’s progress into a Daily Log, you must first load all of the budget items that your crew worked on that day. You will select these from the original estimate you imported from SharpeSoft Estimator.™
The following steps walk you through the process of loading budget items into a daily log.
If this is a new daily log that you have just created, the Daily Log window should already be open on your screen and you can move to Step 2. Otherwise, start with Step 1 to open the log you need.
Open Daily Log
Go to: Job > Daily Log
If you are working on a Foreman System, the Daily Log window for your most recent
work day will open. To select a different daily log, go to the Select another workday field
in the toolbar and click the drop list arrow. From the list that opens, double click on the date you want.

If you are working on an Office System, the Daily Logs by Foreman window will open. There, double click on the daily log you want to edit.

Open the ‘Select Budget Items’ window
With the Daily Log window open on your screen, go to the Actions menu and select Load
Budget Items (or right click inside the window and click the Load selection in the context
menu).
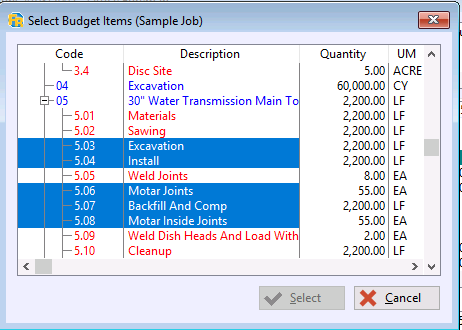
The Select Budget Items window will open. This lists all of the budget items that were included in the job you imported from Estimator

Select the items you need
In the Select Budget Items window, choose the budget items that your crew worked on
that day. Just click on an item and then press the space bar. This highlights and marks the
item for selection. Do this for every item you need. If you want to unmark an item, click on
it and press the space bar again. Once you have marked all of you budget items, click Select.
Your items will be loaded into the Daily Log window, along with their quantities, units of measure, and their estimated costs, hours and production rate. Each item will have its own column, identified in the column header by the budget item number.
When you click in an item’s column, its description is displayed at the top of the window, as shown below. In this example, we have clicked in the column for item 5.03 and its budget information is displayed at the top of the window.

The blue highlighted line indicates the top-level budget item (30" Water Transmission Main to Furnish and Install) while its sub item (5.03 Excavation) is highlighted in yellow on the line below. When you click on a different budget item column, the description at the top of the window will change to display the details for that item.
Edit Selections
You can make changes to your budget items by using the Load, Change, or Remove selections in the Actions menu.
Load Budget Items: This re-opens the Select Budget Items window where all of the previously
selected items will still be marked. If needed, you can deselect any item or mark additional ones for selection. When you return to the Daily Log window, your changes will appear.
Change Budget Item: This allows you to replace a budget item with a different one. When you click in the item’s column in the Daily Log window and use this Actions menu selection, the Select Budget Item window will open. There, just mark the item you want and then click Select. In the confirmation window, click Yes. In the Daily Log, the original budget item will be replaced by your new selection.
Remove Budget Item: Click in the item’s column and use this Actions menu selection to remove it from the log.
Once you have finished loading all of the budget items, you will enter all of the Labor and
Equipment used during the workday.
Conclusion
Getting started with SharpeSoft is a breeze. Whether you are looking to create a new job or add one, SharpeSoft has got your back. We have the tools and expertise necessary to help you make it happen without breaking a sweat.
You can continue on to other helpful Fast Trax articles below. To learn more about this particular subject, consult your system Help manual, or just give us a call and we’ll be glad to walk you through it.
Next Article: Importing a Job from Estimator to Field Reporter
Previous Article: Copying a Work Day

Comments